Showing posts with label Coursework: Part 2. Show all posts

Friday, 13 February 2015

Project - Still Life: Drawing in Paint

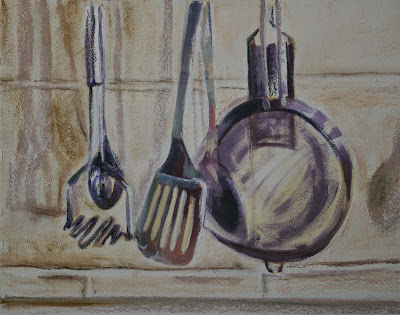
The aim of this exercise was to explore the linear qualities of a simple still life arrangement of household objects in their usual position. I was attracted to the kitchen utensils hanging on the tiled kitchen wall. 

I first made some small sketches starting with blind drawings and continuous line drawings:


I played around with composition in my A3 sketchbook and tried painting the linear elements with black paint. I realised that what I liked about my initial sketches was the quality of line that comes from continuous or blind drawing. I found it wasn't really possible get this when painting with a brush and paint (rather than ink) because I kept having to reload the brush (so lost the flow of continuous line. 

I tried loading diluted paint into a syringe and drawing with a needle attached - this didn't work as well as it had in my previous experiment in 'Drawing 1' with ink because the paint was much thicker and took more force to squeeze through the needle. I also had to have the needle in contact with the paper which was textured - the result was a rather juddery line - a long way from the confident continuous line drawing.


I went back to pen for working out the composition - these sketches are in my A3 sketchbook. I was happy to lose accuracy for the sake of flowing lines - the top one is with a sharpie marker pen and the bottom one with a finer drawing pen:


Next I followed the instructions in the exercise - I drew the linear elements of the composition  on Bockingford watercolour paper  (A2) using a brush and gouache and them worked back into this with gouache (and a bit of soft pastel in the background). It really wasn't working. It all felt very static and dull compared to the interest of the initial sketches. I also realised that this didn't emphasise the linear qualities of the objects as had been my original intention - I needed another approach. 


I had a brainwave! I had enjoyed drawing by squirting ink at the page in my previous course and thought that a way of getting a similar sensation with paint could be to use spray paint so I went to the local hardware shop and bough myself a spray can. 
I developed a greater respect for urban graffiti artists as I grappled with trying to draw with this somewhat uncooperative item! I also developed a banging headache despite wearing a mask and working in a well ventilates area with a a fan drawing the fumes out of the window - I think this might become summer activity so I can work outdoors.

I did a few practice sketches on A2 paper. This definitely works better the larger the paper The thickness of line can be varied depending on the distance of the nozzle from the paper but remains quite bold even at the closest position: 


Finally I drew my composition in spray paint on a sheet of A1 cartridge paper. Having established the linear elements in bold lines with the paint I then worked back into it with oil bars and oil pastels to establish areas of flat colour such at the tiles and the bright reflections from these metallic objects. I kept it quite simple; making no attempt to establish finely modelled surfaces - in this way the freshness and linearity was better maintained. I feel this painting is more successful than the gouache one on Bockingford paper. It has a more dynamic feel to it. Obviously the drawing is less accurate but I don't think that detracts - it probably adds to the feel that it was executed rapidly and is therefore more dynamic.


Friday, 6 February 2015

Understanding Colour: Complementary Colours

The first step in this exercise was to construct a colour wheel like that of Chevreul and to identify the complementary colours. Unfortunately I ran out of the Winsor and Newton primary yellow when mixing my yellow-green and had to use the lower quality Rowney paint. I think you can clearly see the difference in quality in terms of coverage - the Rowney paint contains more filler and less pigment. I have ordered some more of the Winsor and Newton Designer's gouache.


Next, samples of complementary colours were placed alongside each other on a neutral grey background. Whit had been added to the darker of each pair to try to make the tonal values more similar. These colours were then mixed together and then more white added. The next task is to attempt to describe the resulting colours. This might sound simple but is actually a difficult task because of the lack of a very extensive and precise standard vocabulary for the description of colours. The mixture of these colours was also fairly haphazard - mixing different proportions of each colour in each case would result in different tertiary or broken colours. also the different strength of pigments in the different quality paints may have altered the results. 


Orange + Blue gave a muddy olive or lovat green which appeared brighter when mixed with more white - like a mint green but with more yellow overtones

Red + Green gave a very dark tone which read as almost black but could be seen to contain a hint of red. On mixing more white into this the result was a slightly purplish grey. This appeared to me to be the closest to achromatic of all the greys I produced in this exercise.

Red Orange + Blue Green produced a dark khaki which when mixed with white produced a sage green.

Yellow Green + Red Purple produced a cool dark brown. Mixing additional white into this  gave a pinkish clay-coloured taupe.

Yellow Orange + Purple Blue gave a muddy yellow-green somewhere between mustard yellow and olive green. The addition of white produced a yellowish cream. 

Yellow + Purple produced a surprisingly bright sunshine yellow (perhaps the proportion of yellow was too high in this mix to dull the chroma). I added a bit more purple which produced a dull but warm peach colour.

Describing these colours has been very difficult and I do not think it would be possible for another person to reproduce these colours accurately from my descriptions - this is a clear illustration of the difficulties with colour vocabulary and shows why many paint manufacturers resort to numbers to categorise colours. 


I played around with some of the
leftover colours to see what placing
them in various combinations would do.


Understanding Colour: Broken or Tertiary Colours

In this exercise I made a scale from orange red (vermillion) to green blue (cerulean) and a second scale from orange to violet. White was mixed with the combinations to try to maintain equal tones throughout. It can be seen from the subsequent greyscale photograph, that my attempt to maintain constant tonal value wash't really successful - there is really quite a lot of tonal variation here. 


The middle part of the scale shows loss of chroma - these are broken or tertiary colours. They are greys although they are not completely achromatic.


Saturday, 17 January 2015

Understanding Colour: Primary and Secondary Colour Mixing

Key: PYD = Primary Yellow Dark, PY = Primary Yellow, LY = Lemon Yellow
NY = Naples Yellow, YO = Yellow Ochre, SR = Spectrum Red, PR = Primary Red
CR = Crimson, VE = Vermillion, BR = Bright Red, CE - Cerulean, PB = Primary Blue
UL = Ultramarine.
The first step in this exercise was to identify the differences in tone, hue and chroma between the yellows, reds and blues taken directly from the tube. I decided to use gouache for this exercise as I had a wider range of colours to choose from. However, I had two different qualities of gouache. The Windsor and Newton Designers Gouache was of better quality than a pack of Daler Rowney 'Simply Gouache' - these paints had a larger amount of 'filler' compared to pigment and were consequently less intense and more difficult to handle - I won't buy them again. 

All of the yellows were relatively light in tonal value. The primary yellow appeared to be the lightest but its value was quite similar to the lemon below and naples yellow. The Primary Yellow Dark and the Yellow Ochre were darker in value than the remaining yellows but nowhere near as dark as any of the reds or blues. 
Lemon yellow had a touch of green to its hue and this became more noticeable when it was placed adjacent to the Primary Yellow Dark and Yellow Ochre which have an orange and a brown component to them respectively. Naples yellow appeared to be very slightly more orangey than primary yellow but was significantly less intense. 
Lemon Yellow and Naples Yellow were the least intense of the yellows - this may also have been a result of these being the poorer quality paints. Primary Yellow was the most intense so I chose this as my primary yellow.

The reds were more mid-range in total value. Vermillion appeared to be lighter in tone than the rest of the reds but the rest were fairly similar in tone.
Vermillion tended towards the orange end of the spectrum. Crimson was the red containing the most blue. Primary Red and Bright Red also contained a hint of blue. 
Primary Red and Spectrum Red were the most intense reds but I chose Spectrum Red for my primary red as it was less blue.

There was a range of tonal values amongst the blues. Cerulean was the lightest and ultramarine the darkest blue. 
Both Cerulean and Primary Blue showed some greenness whereas ultramarine tended more towards purple. Ultramarine was the most intense blue but had too much red in it to represent a true primary blue so I mixed my idea of a primary blue from a combination of Ultramarine and Primary Blue. 

At the bottom of this sheet I mixed a scale from yellow through to red. However it wasn't  until after I'd done this that I realised I had used PYD instead of PY. I had subconsciously picked up the most orange yellow when mixing this scale.


Key: PY = Primary Yellow, SR = Spectrum Red, PB = Primary Blue,
UL = Ultramarine, VIO = Violet, CR = Crimson, PR = Primary Red
MA = Magenta, WH = White
Next I used my chosen primary colours to mix secondary colours. Yellow to Red, Yellow to Blue and Red to Blue. I made too many gradations at the yellow end of the yellow to blue gradation so didn't leave much space for darker and bluer greens at the other end. The red and blue mixture did not produce violet but more of a burgundy/maroon colour. A better violet was produced by mixing ultramarine with either crimson, primary red or magenta. 

The next task was to repeat these three graduations but to mix white into the darker toned colours to try to maintain a constant tonal value. I found this very difficult to judge - the different colours confused me as regards tonal values - looking at the ranges afterwards It looked to me as though the tones got darker from left to right and then I over compensated with too much white in the blue at the right side. I took a photograph of this sheet in black and white to asses this.


It was clear from this that there was a slight graduation from light to dark on the yellow to red graduation (not enough white added to compensate for the darkening caused by the addition of red). In both of the others I had over compensated by adding too much white to the blue at the right side.


Understanding Colour: Mixing Greys - Anachromatic Scale

This exercise required the mixing of black into white paint to create a progressively darkening scale with the final step being black directly from the tube.


On my first couple of attempts at this, some of the tonal values in the mid range were very similar to each other. I gradually came to realise that it was not sufficient to mix the same amount of black into the mixture each time to make a stepwise tonal gradation. As the tone got darker, a progressively larger volume of black paint needed to be added to make and appreciable difference to the value.


My final attempt has nine steps although step 7 and 8 are quite similar compared to the the rest of the steps so in retrospect it probably should have stayed as an 8 step scale.  I then took scraps of paper painted with a mid-range neutral great and placed them at each end of the scale.  The result is that the grey placed adjacent to the white end of the scale appears relatively darker in tone and the grey placed adjacent to black appears relatively lighter. 

The neutral grey was then used as a base colour for the subsequent colour mixing exercises.