Thursday, 20 November 2014

Research Point: Chiaroscuro

To link to images in this research point, click on the text that is grey.

I am fluent in Italian so the direct translation of this term is very familiar to me,
It is a combination of two Italian words:

Chiaro means light or can also be used in the context of clarity ("Sono stato chiaro?" - "Have I made myself clear")

Scuro means dark so the literal translation or chiaroscuro is lightdark.

When thinking about the term chiaroscuro the works of Caravaggio are those which immediately spring to mind with their very dark backgrounds and small areas of bright illumination making his compositions visually exciting (some examples of this later in the research point). This was the extent of my knowledge on this subject so more research was required.

My starting point was the glossary on the website of the National Gallery which gave a definition as follows:

"This is an Italian term which literally means 'light-dark'. In painting this refers to clear tonal contrasts which are often used to suggest the volume and modelling of the subjects depicted"

"Artists who are famed for the use of chiaroscuro  include Leonardo da Vinci and Caravaggio. Leonardo employed it to give a vivid impression of  the three dimensionality of his subjects while Caravaggio used such contrasts for the sake of drama. Both artists were also aware of the emotional impact of these effects" (1)

Further research via the Oxford Art Online library resource revealed that there are actually four accepted definitions of the term as follows:

(i) The gradations in light and dark values of a colour on a figure or object which produce the illusion of volume and relief as well as the illusion of light and shadow (2)

(ii) The distribution of light and dark over the surface of the whole picture, which serves to unify the composition and creates an expressive quality (2)

(iii) Monochrome pictures including grisaille paintings and painting an camaïeu (2) (examples to explain these later)

(IV) Woodcuts in three or more tones made from successive blocks (2) 

The first three of these definitions are the most relevant to the painting course so I will confine myself to these in this research point (in fact mainly to the commonest usages (i) and (ii). 

First examples the lesser used meanings from (iii)

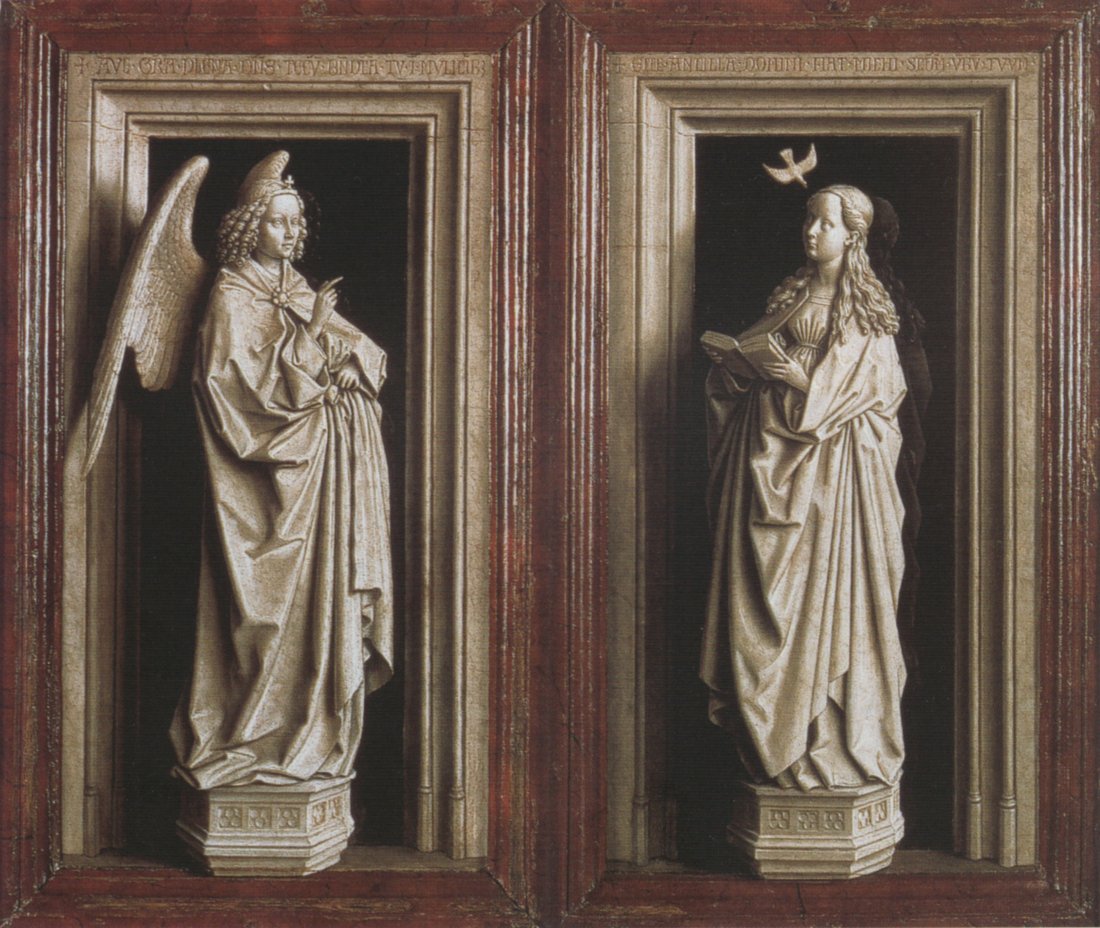
Grisaille painting is monochrome or almost monochrome and was often made to imitate sculpture - for example these wings of a 15th century altarpiece depicting the Annunciation and the Angel Gabriel(3) by Jan van Eyck

Painting en Camaïeu was painting in tonal values a single colour to imitate ceramics or cameos. I could find very few examples of this Click here for an image

For definition (i) above a good starting point would be the drawings of Leonardo Da Vinci for example this study of drapery.(4) Here the artist has started on a mid toned ground and used charcoal or black chalk to describe the shadows and white chalk for the highlights to build the form and relief. He has "modelled the light".

But Leonardo also provides examples of usage (ii) of the term chiaroscuro. For example in his famous masterpiece The Mona Lisa. (1503-1507) I saw this painting when I was a teenager during a visit to the Louvre on a school trip to Paris. I remember being somewhat underwhelmed as the painting was so much smaller than I had expected and was quite dark and surrounded by crowds of people which meant I couldn't get close to examine it. However, it does exemplify both of the common definitions of chiaroscuro given above. There is the modelling of form with light both on the drapery and on the facial features as well as a strong contrast between the dark shadows and the ethereal glow of the illuminated face. It also illustrates 'sfumato' (the Italian verb sfumare has various translations such as to fade away, vanish, obscure). In this context it means to blur or make transparent the edges of shadows to appear as though they are veiled in smoke. (2) This sfumato effect is particularly seen in the representation of the facial features.


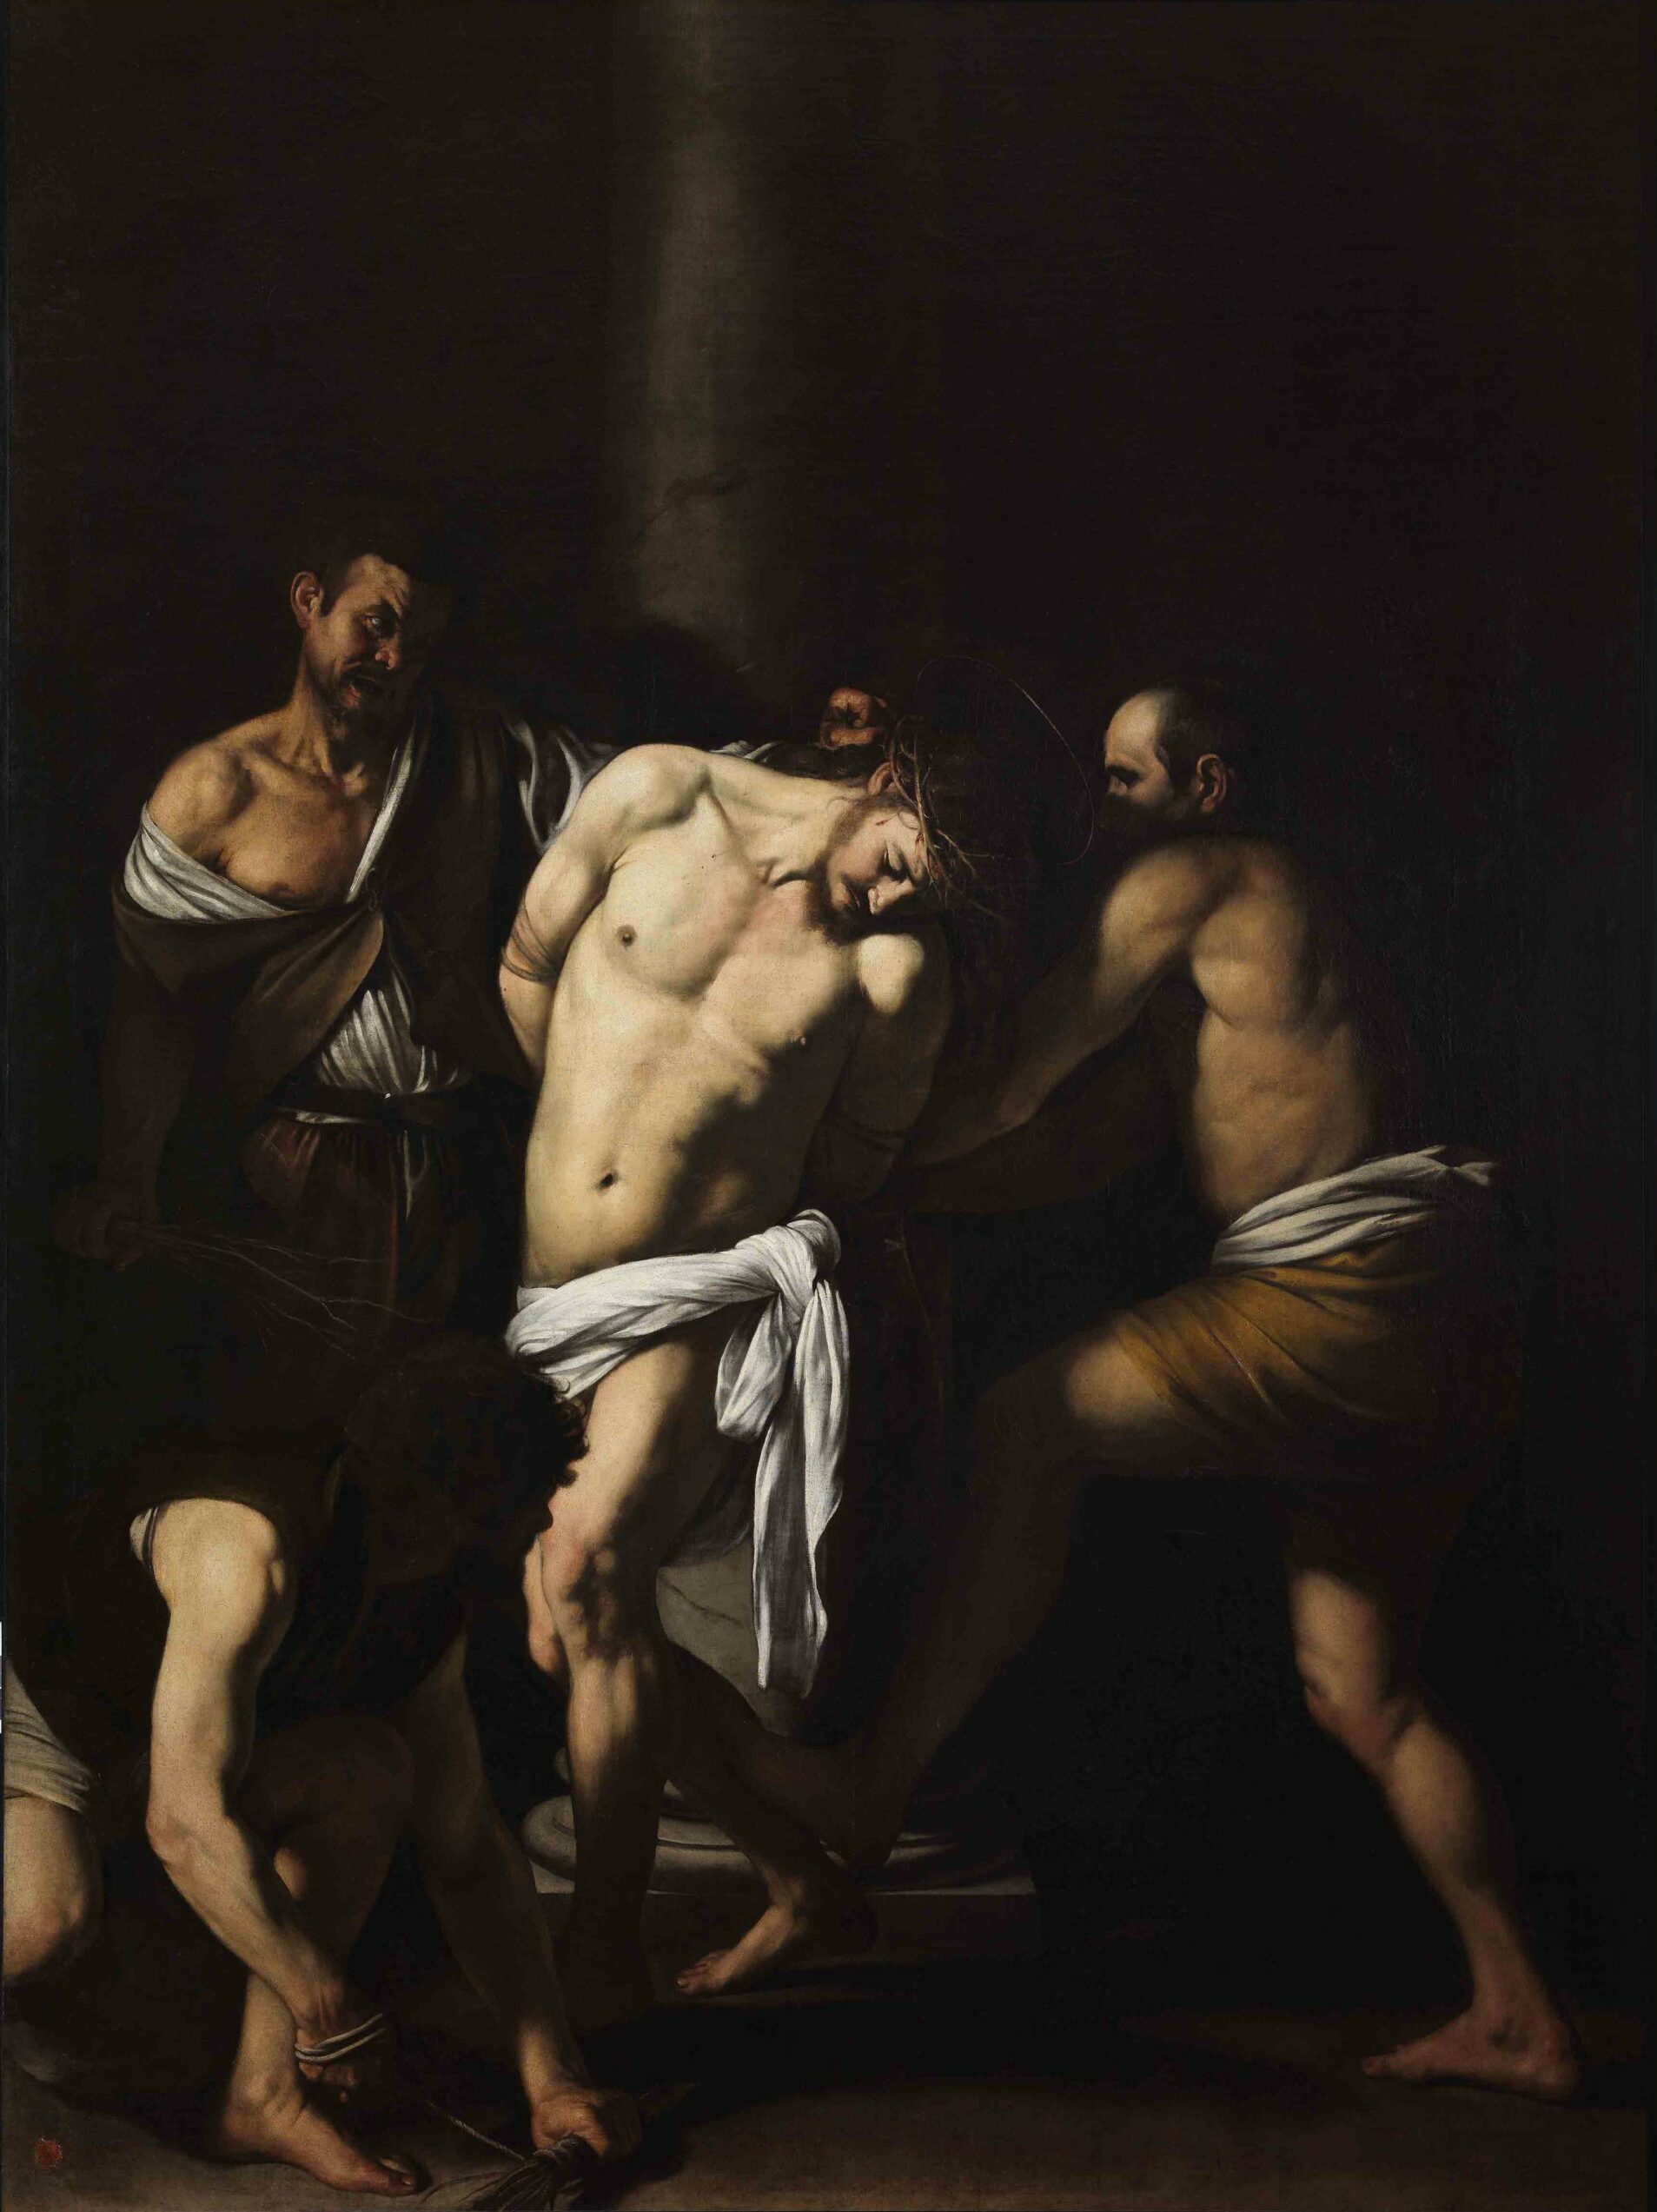
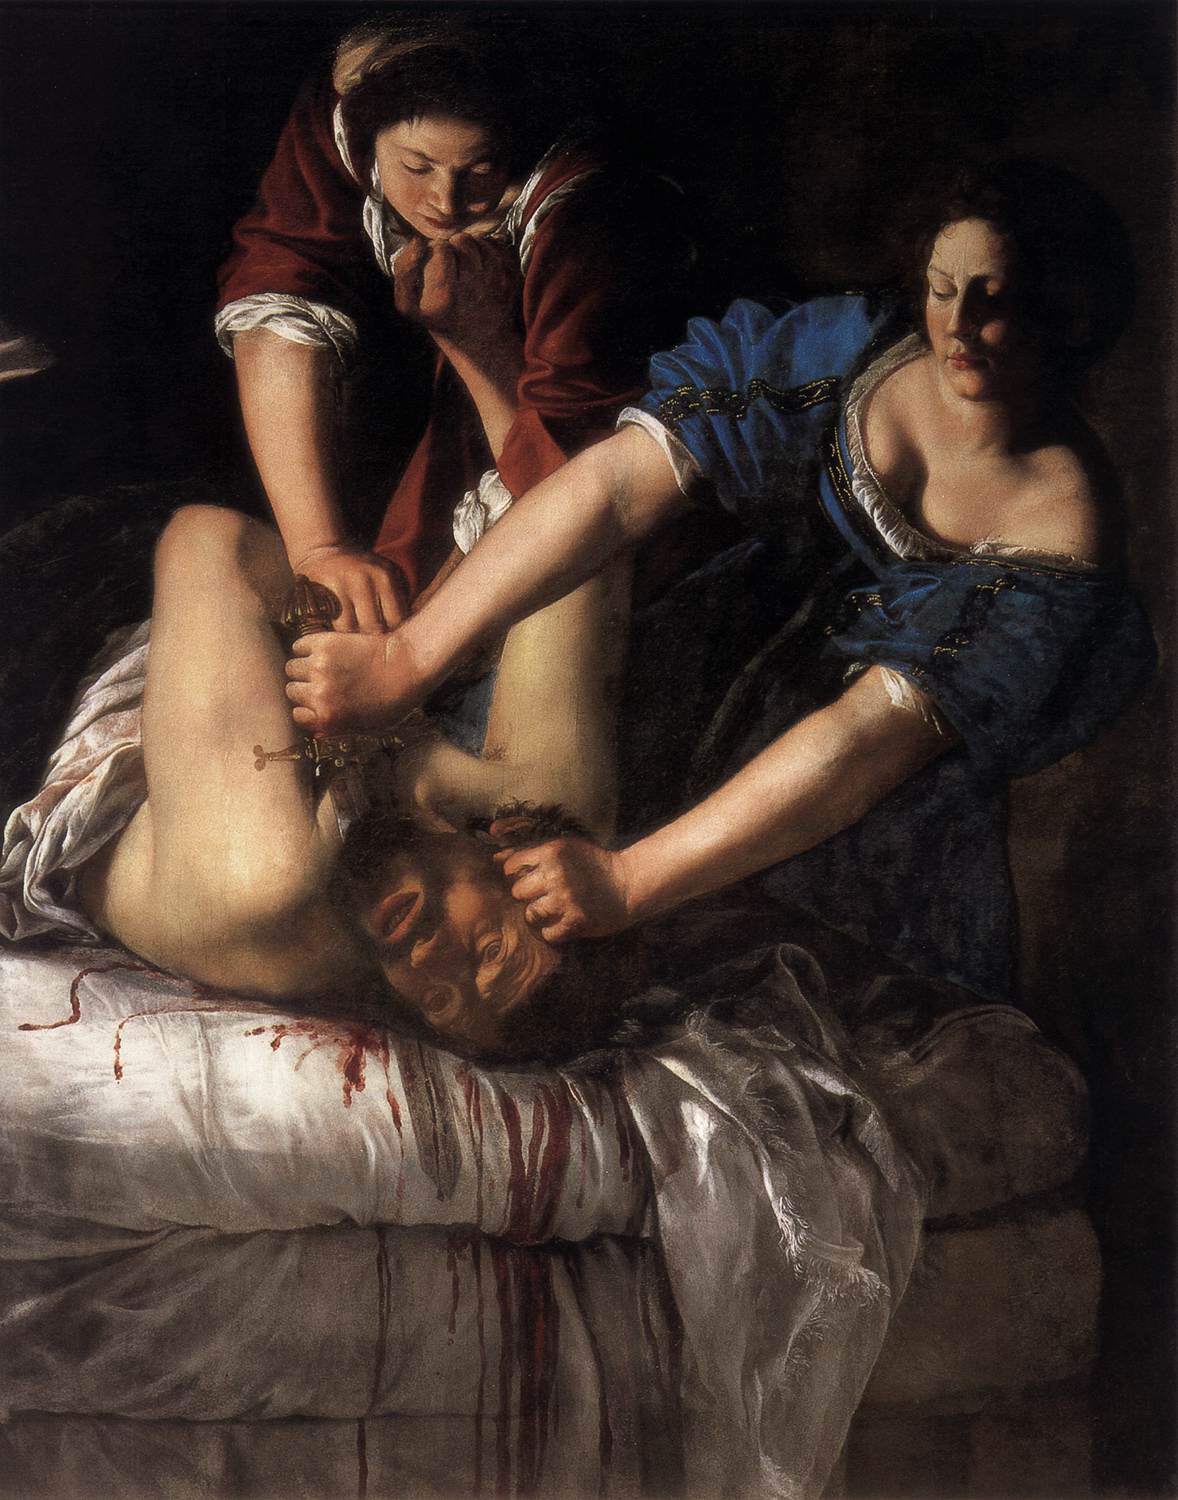
Definition (ii) of chiaroscuro is what comes to mind more readily in my previously uneducated mind. I am lucky enough to live near Naples and have made several visits to the Museo Nazionale de Capodimonte over the years. Two striking examples of works exemplifying the dramatic and expressive effects of Chiaroscuro seen here are Caravaggio's Flagellazione di Cristo (1609-1610) (5), (7) the cowed body of Christ is brightly illuminated whereas his tormentors are just partly illuminated in the shadows and the rest of the canvas is in complete darkness. The second example I would like to cite is Artemisia Gentileschi's Giuditta e Oloferne (1625-30) (6), (7) Here Judith and her servant are in the act of beheading the giant Holofernes. Again there is marked contrast between the dark background and the illuminated action - the arms they are carrying out the violence are the most illuminated part of the painting in particular Judith's arms which for a dramatic diagonal as she reaches down with the sword. This gives the whole composition a theatrical effect. In fact there was even more personal significance to this painting for Gentileschi as she uses her own self portrait to represent Judith and she is slaying her former mentor Agostino Tassi who was tried in court for her rape.(8)

There is a theatre group in Naples called Teatri 35 who exploit the drama and theatricality of these works of art creating "tableaux vivantes" representing works of art. I recently went to one of their workshops 'Caravaggio e i caravaggisti' (caravaggio and his followers) in which they physically represent the works of famous artists - They hold their poses for 20seconds allowing the audience to rapidly draw them. at the time I was struck by the drama of the poses. Only now am I realising how entirely appropriate the bright theatrical illumination in a dark theatre is to the representation of these works  of art. You can read about my experience of the workshop in my learning log for Drawing 1 Click Here for link

The examples above might give the impression that chiaroscuro was a 16th and 17th century phenomenon. In fact the term surfaced in art theory in Italy in the 15th century -however use of graduations of light and dark to represent form started to emerge in the 13th century(2). Around the end of the 13th and the beginning of the 14th century Giotto was already mixing variable amounts of white pigment with colours to create tonal gradations to represent form For example in this panel painting - The lamentation of Christ.(9)

It was in the 17th century that the term came to mean more about the organisation of areas of light and dark in the composition on the canvas. I.e. the consideration of the chiaroscuro of the whole arrangement in addition to the chiaroscuro of individual elements of the composition - so the design of the whole canvas. The meaning was also extended to include lightness and darkness of colours independent of light and shadow. 

In the late 18th century writings by Denis Diderot made a distinction between the chiaroscuro used in the representation of light and shadow and that attributed to the imagination of the artist for dramatic effect. The exaggeration of natural lighting conditions or careful selection of illumination were used to add emotional impact and enhance the expressive qualities of painting. (2).

Another term used to describe these paintings in which there is marked contrast between dark and light is 'Tenebrism' (10) (from the Italian 'Tenebroso' which means dark/shadowy/gloomy). This is a term used to describe the works of Caravagigio, Gentileschi, Tintorretto(11) and others. In fact the word 'tenebroso' was used as a criticism of these works of art in literature from the 17th to the 19th century - taken to mean the unnatural effect and perceived crudeness of their lighting scheme. So the marked chiaroscuro effects have fallen in and out of fashion over time. 

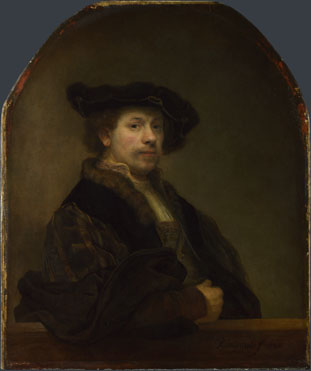
Another famous tenebrist artist who came to this way of working without having direct prior knowledge of Caravaggio is Rembrandt. For example this is seen in his many self portraits painted using candlelight illumination. 

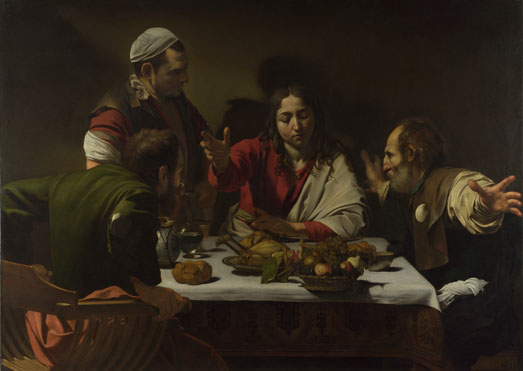
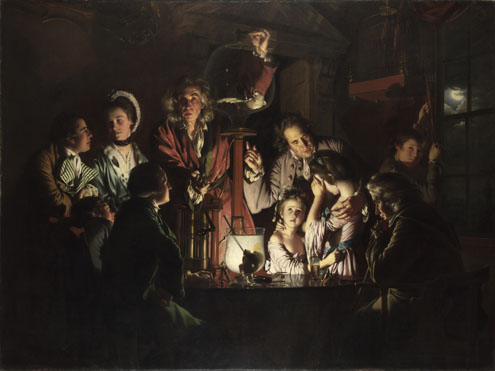
In August of this year I made a trip to the National Gallery where I saw several examples of chiaroscuro painting including Self Portrait at the age of 34 by Rembrandt (1640) (12), The Supper at Emmaus by Caravaggio (1601) (13) and Experiment on a Bird in the Air Pump by Joseph Wright of Derby (1768) (14). This illustrates that the taste for dramatic lighting in paintings  extended beyond the boundaries of individual countries and also across centuries. The dramatic lighting might resulted partly from candlelight illumination but it seems to me more to have been motivated by a taste for drama. The work by Joseph Wright of Derby mentioned above seems to tip over almost into the melodramatic. It depicts a bird (a white cockatoo) being suffocated in a vacuum pump in front of an audience. The man carrying out the experiment is lit from below making his face look rather sinister and the illumination is greatest drawing our attention to the faces of two distraught young girls. I think the drama here is a bit staged and laboured so can see why 'tenebroso' might have been used as a pejorative term in the 18th century. To me this picture - while I can appreciate the skill of the painter it is all a bit 'OTT' in its dramatisation of the subject matter. 

References: 

(1) http://www.nationalgallery.org.uk/paintings/glossary/chiaroscuro

(2) Chiaroscoro. Janis Callen Bell. article from Grove Art Online via Oxford art online
http://www.oxfordartonline.com/subscriber/article/grove/art/T016397

(3) http://www.artbible.info/images/vaneyck_annunciatie_thyssen_grt.jpg

(4) http://uploads8.wikiart.org/images/leonardo-da-vinci/drapery-for-a-seated-figure-1.jpg

(5)http://upload.wikimedia.org/wikipedia/commons/0/0e/Caravaggio_-_La_Flagellazione_di_Cristo.jpg

(6)http://upload.wikimedia.org/wikipedia/commons/4/4e/Artemisia_Gentileschi_-_Judith_Beheading_Holofernes_-_WGA8563.jpg

(7) The National Museum of Capodimonte (Guide Artistiche Electa Napoli)  Edited by Silvia Cassani. English Edition. Electa Napoli 2003

(8)http://en.wikipedia.org/wiki/Judith_Slaying_Holofernes_(Artemisia_Gentileschi)

(9)http://upload.wikimedia.org/wikipedia/commons/3/3a/Giotto_-_Scrovegni_-_-36-_-_Lamentation_(The_Mourning_of_Christ)_adj.jpg

(10) Tenebrism. Janis Callen Bell. article from Grove Art Online via Oxford Art Online. http://www.oxfordartonline.com/subscriber/article/grove/art/T083775

(11) http://uploads3.wikiart.org/images/tintoretto/self-portrait.jpg

(12) http://www.nationalgallery.org.uk/upload/img/rembrandt-self-portrait-age-34-NG672-fm.jpg

(13) http://www.nationalgallery.org.uk/upload/img/caravaggio-supper-emmaus-NG172-fm.jpg

(14)http://www.nationalgallery.org.uk/upload/img/wright-experiment-bird-air-pump-NG725-fm.jpg


Saturday, 15 November 2014

Working on Different Coloured Grounds

I started this exercise by making some still life sketches in my sketchbook using charcoal, ink and wash and also using an 8b woodless pencil. I struggle to know what makes a good composition so I made quite a lot of thumbnail sketches. I wanted to include a wide range of tonal values but also to make quite a simple composition without losing visual interest or impact. 
I was first attracted to the rich dark but reflective surface of an aubergine which I thought would make a good area of darkness. However, my composition of vegetables lacked any variation in height. I experimented with propping up a pepper for height and also with a light coloured jug, the handle of which made some good negative shapes against the dark background. However, I found the shape of the jug a bit squat and in the end I decided to go with a very simple arrangement with three elements (eliminating the aubergine altogether), - a largish beer bottle, a yellow pepper and a group of two onions. I had sketched this image while sitting on the floor with the objects on a low (white) picnic table and I liked the perspective this gave me. I also liked the diagonal of the foreground onion leading the eye towards the other two elements and the shapes made between the bottle and the shadows of the onions. 


I didn't find the instructions for this exercise completely clear as to whether I was meant to do a light and a dark ground or a white and a mid-toned ground so I elected to do three studies instead. One on a white ground, one on a mid toned ground and one on a dark ground. 


Exercise: Tonal Study on a White Ground


I had received the alternative solvents that I had ordered so I decided to attempt this exercise in oils. The first sketch was on a white ground using a combination of prussian blue and raw umber.  This was my first attempt at a representational oil painting so my approach was a bit panicky - I think you can see the results of this nervous energy in the end result. I didn't organise my palette at all because I didn't think this was necessary using only the two colours and white so I ended up with random blobs of different colours and tonal values all over the place on the palette and some of the tones ended up being a sort of dull putty colour. However, for a first attempt the results weren't quite as bas as I'd expected. I had managed to create a sense of volume in the subjects and also an idea of the reflective but dark surface of the bottle.  The white of the paper gives a glowing light tone.


The good news was that using Gamblin Gamsol (an odourless type of mineral spirit) as a substitute for the turpentine, I hadn't developed a solvent headache.

Tonal Study on a Mid Ground

It was only during this painting that I realised that both of the colours I had chosen were cold colours. I had meant to choose a warm earth tone to combine with the prussian blue. In my mind, raw umber sounder warmer to me than burnt umber (burnt sounds like ash or charcoal so darker and greyer or cooler). Unfortunately - it appears it is the other way around and burnt umber would have been a warmer choice. However, I quite like the atmosphere that the cool palette brings to these studies. It reminds me of old-fashioned sepia -toned photographs.

In the second study I mixed a mid tone which was mainly raw umber with a very small amount of prussian blue and this was used for a wash to create the mid-toned ground. 
I made a note of the proportions of umber to blue used so that I could re-create this colour to paint with once the wash was dry. On my palette I then mixed a range of tonal values by combining this with variable amounts of titanium white. I mixed larger amounts of prussian blue with the base colour to create the darker tones - this meant that I could paint in either direction tonally from my base colour. I felt a bit less panicky when painting this second version as I was familiar with the set-up and I had organised myself better. 


I had started to enjoy manipulating the paint on the paper. I started out by squinting an placing the very darkest and the very lightest tonal values and build the forms from there, This seemed to be easier on the mid-toned ground especially as I had pre-mixed a tonal range. I found it was possible to overlay and work different tonal areas into each other on directly on the paper because the oil paint was slow to dry allowing gradual tonal changes to be made. I especially liked the marks made by scraping the light tome over the mid ground with a dryish brush in the lower right hand corner. 
I enjoyed the process of painting this study the most of the three. Looking at it though, I wonder whether being more organised has reduced the energy of the study produced compared to the first attempt


Tonal Study on a Dark Ground

For the third study I painted on a dark background made for a combination of mainly prussian blue combined with a small amount of raw umber. I used this base colour for the darks values and used mainly raw umber for the mid tones with the base colour mixed with titanium white. This was more rapidly executed than the second study (I was getting a bit bored with the subject by now). I found it quite difficult to get a really light tone to cover the background especially in the lower left corner of the study.  

I like the richness of the deep tones on the bottle and the contrast with the bright reflections on its neck. I also like some of the visible brush marks on the onions. Less successful in the pepper which looks very flat and sharp-edged - I haven't really conveyed the three dimensionality of this form very well. The bottle is also a bit broader and squatter than it was in reality - it's starting to look more like a milk bottle than a beer bottle.


I photographed each of these studies in black and white and placed them side-by-side here for comparison. It illustrates that the drawing is far from perfect with quite a lot of variation between the painting on the shape of the bottle in particular - but I think this is probably less important than the comparison of the tonal values. Overall I don't think the comparative tonal ranges are too different. There is certainly a greater tendency towards the lighter tones when painting on the white background and the tonal values especially on the pepper are generally darker on the the dark ground. I found controlling the tonal rages and unifying everything easiest on the mid toned ground.


Monday, 3 November 2014

Research - Working on Coloured Grounds

For the Project ,'Working on different coloured grounds' it was suggested that I look at oil sketches by Rubens and by Constable. I have posted links to a couple of examples of sketches by each artist below:

Rubens Oil Sketch 1
Rubens Oil Sketch 2

In both of the examples above Rubens has used a warm earth colour as the ground and has added darker and lighter tonal values to create form. The warm background colour unifies the compositions. 


Constable Oil Sketch 1
Constable Oil Sketch 2

The first sketch by Constable above is one of his famous cloud studies and one of the more dramatic examples of cloud formations. He has also used a warm ground although the sky is shades of grey and black but a hint of the warm ground shows through in the sky towards the horizon and a stronger warm tone is used for the beach. 
In the second sketch, he has used a dark ground and has painted with lighter tones onto this ground. There is dramatic tonal variation here. I particularly like the grainy dynamic diagonal brush strokes used on the sky and the hints of the dark ground showing through this adding texture, depth and visual interest. This also helps again to unify the painting by echoing some of the shapes in the trees.

Saturday, 18 October 2014

Research Point: Mark Rothko - The Seagram Murals

These paintings can be viewed on the Tate website by clicking here.

I was aware of Mark Rothko and the seagram murals before this research point came up. However, I had only seen the work in reproduction. In fact, the context in which I had mainly seen Rothko paintings was as in large framed prints which went nicely alongside Ikea furniture so my attitude initially was along the lines of - 'nice colours for interior decor but so what?'

I realised that I may not be getting the full experience in the mass reproduced prints and online photographs so I visted Tate Modern to look at them 'in the flesh'.

The paintings are housed in a relatively small room considering their large size so this contributes to a somewhat claustrophobic feeling. There is no getting away from them or casually drifting past (although there are two doors so it is theoretically possible to just skip through the room) - the dim lighting abd the layout encourage you to sit on the benches provided and stare for a while.  I found this quite meditative. 

The paintings are large in scale - some are in portrait and some in landscape format and they are created in various shades of red, burgundy, maroon and black. The paintings are completely abstract each with a main colour and then a frame-like square or rectangular shape. The shapes are not regular or hard- edged though. If you get up close to the paintings you can see that there are many thin layers of paint applied and they are feathered over each other to create this uneven and irregular/indistinct edge. 

Sitting and looking, I became aware that this created an optical illusion - as my eyes started to lose focus slightly there was an illusion of depth - this I found particularly marked with the red on maroon painting(Click here for image of this painting). It felt as though there was a space behind the red frame through which you could be drawn to a more misty, nebulous background- then the painting came back into focus and once again looked as it was - a flat picture plane. This was quite disconcerting. The feathered edges of overlapping colour had a strange throbbing/vibrating appearance against each other. 

I looked at one of our set textbooks 'This is Modern Art' by Matthew Collings Weidenfeld & Nicholson 1999 for more information on the Seagram paintings. There was some information about Rothko in the chapter 'Nothing Matters' (pg 141-182) but I found the writing style quite flippant and it didn't give me much useful information : 
'His most famous dark paintings are fourteen virtually all-black paintings completed in 1967 as a commission for a chapel in Houston. He did some other really murky maroon ones for a restaurant in 1959 but then changed his mind and they went to the Tate gallery in London instead.' (more about this chapter in the 'reading and reflection' section of this blog)
So I needed to research elsewhere to make sense of the paintings.  

Searching for information about Rothko's painting technique I found this video in the moma multimedia section (The Painting Techniques of Mark Rothko . No 16 (Red, Brown and Black) Abstract Expressionist New York - The Museum of Modern Art. October 3 2010- April 11 2011)
In this video the presenter demonstrates how Rothko mixed his paints with a large amount of turpentine and applied it vigourously to rub it into the surface of the canvas like a stain rather than a surface application. Multiple very thin layers of paint were built up on top of one another often of markedly differing colours - the underneath layers of paint could be read through the surface layers giving a complex result. He would also sometimes take a rag soaked in turps and scrub back into the margins of the shapes he had applied to the canvas in order to break up edges and make them more indistinct. 

I also read  this article in the Guardian by Jonathan Jones 
 www.theguardian.com/culture/2002/dec/07/artsfeatures
The above article/essay was more informative than Matthew Collings and most of the following information has been taken from this. 
The paintings were produced in response to a lucrative commision to provide artwork for the Four Seasons Restaurant in the Seagram Building in New York which was completed in 1958. This was an opulent restaurant in which the city's rich and powerful would dine. The awarding of the comission was a major success for Rothko - particularly given his under-privileged start in life. 
Rothko was born Marcus Rothkowitz, - a Russian Jew. His family moved to the USA when he was 10 so he may have felt like an outsider and was certainly poor during his childhood. In adulthood he was left wing and he was also reputed to be quite an intense personality who was prone to depression (he eventually committed suicide in 1970). So what might have motivated him to accept a commission to decorate such a symbol of capitalism? He described the Four Seasons restaurant as, 'A place where the richest bastards in New York will come to feed and show off'. He is also quoted as saying, 'I hope to ruin the appetite of every son of a bitch who ever eats in that room' - he wanted to feel that they were, 'trapped in a room where all the doors and windows are bricked up'

Rothkos's concept for this series of paintings was partly inspired by Michelangelo's vestibule of the Laurentian Library which is off the cloister of the Medici church of San Lorenzo in Florence. There are apparent windows in the room but they are actually sealed and dark making the atmosphere oppressive or claustrophobic. Click here for an image of the Laurentian Library Vestibule

His other inspiration was the dining room in the Villa of Mysteries in Pompeii. Click here for an Image from Wikipedia The frescoes in this room are in shades of red and black and depict dionysian (bacchanalean) rituals creating a luxurious but unsettling place to eat. Rothko talked about wanting to 'create a place' rather than just to hang pictures.

Rothko dined once at the Four Seasons restaurant. This may have made him realise that the type of diners he encountered there would not have the commitment to engage with his paintings and he would, therefore not achieve the interaction and effect he intended. His paintings would after all become just expensive pieces of decoration. He withdrew from the commission and never delivered any paintings to the Seagram Building. He agreed to donate some of the paintings to the Tate gallery on condition that he would have his own input into how they were displayed. 

Having experienced the paintings at the Tate I would say that he did achieve his intention of giving the impression of closed off claustrophobic windows that tantalise you that there might be some depth or something beyond and that then show themeselves just to be flat planes. They are, therefore, successful paintings but Rothko's intention to upset and unsettle the super-rich patrons of the restaurant for which the paintings were intended was always somewhat overly ambitious. 

Reference Material Used:

http://www.tate.org.uk/whats-on/exhibition/rothko/room-guide/room-3-seagram-murals

'This is Modern Art' by Matthew Collings Weidenfeld & Nicholson 1999. 'Nothing Matters' (pg 141-182)

The Painting Techniques of Mark Rothko . No 16 (Red, Brown and Black) Abstract Expressionist New York - The Museum of Modern Art. October 3 2010- April 11 2011)
http://www.moma.org/explore/multimedia/videos/123/689

'Feeding Fury' Jonathan Jones. Guardian Culture Section. Saturday 7th December 2002
http://www.theguardian.com/culture/2002/dec/07/artsfeatures

Images in the public domain from Wikipedia:

http://upload.wikimedia.org/wikipedia/commons/c/c0/Laurentian_Library_vestibule.jpg

http://upload.wikimedia.org/wikipedia/commons/2/26/Roman_fresco_Villa_dei_Misteri_Pompeii_008.jpg


Friday, 17 October 2014

Transparent and Opaque: Monochrome Studies

In this exercise the aim was to build a picture of an object (the suggested subject was a winter tree) in two different ways. First by painting dark positive shapes on a light background and subsequently by painting light coloured negative shapes onto a dark background. 

The suggested subject was ideal as we are in the right season for bare trees so I started by going out for a walk and drawing some rapid sketches in my A6 sketchbook using an ink brush pen and some watercolour.
 

I then went on to make some watercolour sketches of trees in our and the neighbour's garden. And also some closer studies in ink and fine liner of sections of branches and the shapes made by the twigs between them - these started to tend more towards abstraction.


I made larger versions of these using white gouache to paint negative spaces on black paper and using India ink to make the branch shapes in white paper.


I then completed the exercise as directed in the course notes. I used acrylic paints for this exercise. First I pre - drew a tree shape in charcoal over a dry pale grey wash. I then painted the tree shape in an opaque dark grey. I repeated the same image again but this time painting freehand rather than pre-drawing over the pale wash. This produced a slightly more fluid and less angular shapes. I modulated the grey from very dark opaque at the trunk to gradually lighter grey towards the narrower twigs.  


After the pale background I turned my attention to the dark ground. I lightly sketched the shape of the tree using a white charcoal pencil and used  a very light toned grey opaque paint to paint in the negative shapes between the branches.  I made a couple of other studies in the same way using washes and opaque mixes of violet.


I found that the opaque dark paint easily covered the paler wash when painting the positive shapes of the trees giving a crisp and distinct image. The light coloured opaque paint despite being fairly thick consistency didn't cover the dark background so easily . The result was some irregularity in tone in the negative shapes painted. However - this method really did draw attention to the negative shapes - it reminded me a bit of making a stained glass window with the leading in between left unpainted. This technique could be used for example to emphasise that a silhouetted tree is backlit against a light sky. Although the coverage was quite uneven, I found the result quite aesthetically pleasing and to me the paintings made by painting the negative spaces seemed more lively than those made by painting  the dark shapes of the trunk and branches.


Friday, 10 October 2014

Transparent and Opaque: Tonally Graded Wash/Overlaying Washes/Opaque Colour Mixing

Exercises: Tonally graded wash and Overlaying washes.


I tried this exercise both with acrylic and with oil paint and made notes in my sketchbook about the handling of each.

I started off using the acrylic paint and my first few attempts were really very poor. Partly because of the rapid drying of the paint, I ended up with a page of stripes rather than a subtle tonal gradation. The other problem I encountered was that mixing too much water with the paint caused it to completely lose its structure so I ended up with water with a few granules of pigment which seemed to deposit themselves unevenly on the paper. I used violet and french ultramarine. The ultramarine seemed particularly grainy.


I kept trying and eventually ended with some passable graded washes:


The layered washes on the left side of the above photograph were created by layering a wet wash over a dry one. The right side washes were layered wet into wet. The wet into dry layering was more controllable. Working wet into wet gave less control but made some interesting marks which could be exploited in paintings.

I then made a number of layered washes both wet into wet and wet into dry with a few of my paints to experiment with colour mixing. Again, working wet into wet created some interesting marks which might be considered faults in the paint application but I quite like them. The wet into wet layered washes of cerulean with yellow ochre were particularly reminiscent of landscape (beachscape in particular)  I also layered washes of colour over a dry wash of cadmium yellow hue and over a dry wash of red to create various mixes.


 Exercise: Opaque Colour Mixing

The object of this exercise was to try to recreate the colours and tones of some of the transparent graded washes but in opaque paint by using white paint to create the lighter tomes rather than the white of the paper showing through the paint. I chose a single colour graded wash of ultramarine, on overlaid wash of cerulean with yellow ochre and a graded wash of ultramarine and violet to attempt to reproduce. The washes had been created with oil paint diluted with turps - I had tried to create the cerulean wash with the paper upright on a easel and this meant that the paint had run down causing drips on the wash - I learnt from this that it is best to apply the washes with the paper flat on a table.
I mixed the opaque colours which I though corresponded pretty well to the tonal values which I had made with the original washes. I was quite happy initially with the results until I photographed the washes side by side in black and white. It then became clear that I wasn't quite as good at identifying the tonal values as I had thought. 
Unfortunately, during this exercise I also found out that I was quite sensitive to turps fumes. Despite having the window wide open I had a splitting headache and was nauseous by the time I finished. I really do prefer the oil paints to the acrylics, however so will search for a suitable alternative to turps - I'll have to use acrylic paint in the meantime


Thursday, 2 October 2014

Basic Paint Application: Painting with Pastels

Exercise: Painting with pastels

I spent quite a lot of time working with pastels in Drawing 1. Here are a few of examples of my previous work:

Soft Pastels:

Soft pastels on a sandpaper ground

Soft pastels have been crushed and applied with a
paintbrush to ad a hint of colour to a pen and ink drawing

Soft pastels on a dark ground (Ingres paper)


Oil Pastels:

Oil pastels on a dark green ground

Oil pastels and oil bars on a pale grey ground
There were a couple of other ways of using the pastels that I had not yet tried apart from in small sections in my sketchbook (for example combining pastels with paint and using oil pastels with solvent) so I decided to make a couple more drawings.

Oil pastel on prepared acrylic paper
We have had a large crop of pomegranates in the garden this year so I decided that these would make a suitable subject for my first sketch. This is a very rough sketch simply as a vehicle for using some different techniques without trying to be accurate with the drawing. I scraped off bits of the oil pastels and oil bars with a palette knife and smeared and script it  about on the paper . I also used some turps on a brush to spread the colour about.


Soft pastel and gouache on black paper
The very rapid sketch above used blended and smeared soft pastel in combination with gouache. It is abstract but was inspired by a view of Naples from an aeroplane when coming in to land.